Showing posts with label geometry. Show all posts

Thursday, January 1, 2015

Vayechi- Proprioception and Mental Imaging related activity ideas

"Joseph took the two of them- Ephraim with his right [hand], to Israel's left, and Menashe with his left, to Israel's right- and he drew close to him." ~Genesis 48:13

Rashi on 48:13 explains:
Ephraim at his right, to Israel's left- One who comes toward his friend, his right is opposite his friend's left. [Joseph] intended that the firstborn should be properly prepared for the blessing.

Last year in Parshat Beha'alotcha I wrote about proprioception and the difficulties that many people have (even as adults) in differentiating between their right and left. Given this issue that many people struggle with, I thought it interesting when I reread this week's parsha and noticed that:
  1. the Torah itself states the distinction- Ephraim was on Joseph's right, which was Israel's left; and Menashe was on Joseph's left, which was on Israel's right
  2. Rashi makes a point of also explaining this difficult concept further- when one person approaches another, the person's right is actually opposite his friend's left
Spatial awareness is important for us as we live day-to-day in our 3-dimensional world. Shapes, the space they take up, and their orientation in relation to other items in their vicinity are part of our everyday lives. 
  • To run and catch the subway train as its doors are closing, I have to turn sideways to fit through
  • Which direction do I need to turn the table to fit it through the doorway?
The geometric math concepts that we work on with children as they grow and develop are all meant to help them build this awareness of spatial relationships, how shapes can be used for the greatest stability in our buildings, how shapes can fit together for the best use of space in our daily lives, and how the space that we take up within our surroundings will intersect with the space that other people and objects in our surroundings take up.

Activity Connections:
Activity ideas in increasing conceptual difficulty:
  • For younger students, just starting by recognizing their left and right sides is difficult enough. Using left and right in directions as much as possible where applicable will help increase their familiarity. Everyday exposure to the distinction will make a big difference in making the concept more familiar and usable for them. Labeling left and right on a board or in primary locations at home or in the classroom will help give students a quick reference when they're unsure and thinking about the concept. When students are comfortable with the alphabet, they can also use their hands to check themselves- the thumb and forefinger of the left hand form an "L" when you're looking at the back of your hand, while the same formation with your right hand will be a backwards "L". 
  • As students begin to feel comfortable with their own right and left, a fun activity is to have them wear left and right labels (on their hands or near their shoulders) and see what happens to their own left/right and their friends' left/right as they stand in line behind each other, walk towards each other, and turn around in different ways. This activity will help students gain a better understanding of the concept that the parsha and Rashi are explaining this week. As students work more and more with left and right, if they do have difficulty, they will also learn to develop tricks that they find helpful for themselves.
  • On a higher level, spatial conceptualization can move beyond right/left orientation towards rotations (turns), reflections (flips), and translations (slides) of 2-dimensional and 3-dimensional shapes. 
    • Again, for younger students they can have actual shapes that they turn, flip, and slide and they can draw diagrams to go with their activities. Playing with shapes and looking at the way a shape appears differently in different positions helps students develop their mental imaging skills, while diagraming the changes that they find helps them make note of particulars that they may overlook when just looking at the shape.
    • Students will usually find it easier to diagram the 2D shapes and then they can progress to diagraming 3D shapes. Students will begin to notice more interesting changes as they move into 3D shapes- sometimes not all of the sides are the same shape, for example. As students explore, they will find similarities and differences between different shapes and begin to categorize shapes for themselves in different ways. As they develop their understandings of the different shapes, they will be storing mental imaging for themselves that they can call on in future learning.
    • Once students have formed mental images for themselves, they can think about given situations where they are provided with information about spatial relationships and they need to work out the connections between different orientations. For example:
      • Remember those baby blocks that have different shapes on each side? If students are given drawings of that type of block from different angles, they should be able to figure out which shapes are on which sides of each other in order to recreate an image of a full block.
      • If you diagram a building block structure, can you figure out from the diagram how many blocks you need and how to recreate the structure? Younger learners can practice by actually trying to recreate the the structure with real blocks, while more adept students can work on their mental visualization of the shape in order to figure out the information that they're asked to find.
      • Try to fit two dressers (of certain dimensions) next to each other in a given space (of certain dimensions and configuration)- what will be the best way to fit them next to each other? What will the space look like if I put them side by side? What about back to back? Is there a different orientation that will fit in the space in a better way? Remember, you need to be able to open the drawers!

Thursday, October 23, 2014

Noah- Geometry & Pythagorean Theorem

"G-d said to Noah, 'The end of all flesh has come before Me, for the earth is filled with robbery through them; and behold, I am about to destroy them from the earth. Make yourself an ark of gopher wood; make the ark with compartments, and tar it inside and out with pitch. This is how you should make it- three hundred cubits the length of the ark; fifty cubits its width; and thirty cubits its height. A light shall you make for the ark, and to a cubit finish it from above. The entrance of the ark you shall put in its side; make it with bottom, second, and third decks...'" ~Bereishit 6;13-16

Rashi on 6;16 explains that "And to a cubit finish it from above" refers to a sloped roof which narrowed at the top and was 1 cubit high at the topmost point, allowing the water to flow downward off the roof on both sides.

The idea for this post developed when I was working with a student on a different math project related to the ark. This was a question that arose, but since she was focused on a different mathematical concept, she chose not to pursue the question below. Since our conversation last year, I've been looking forward to investigating this question for this parsha.

Pythagorean Theorem:
The Pythagorean Theorem is a theorem that we use when calculating with right triangles (triangles that have a right or 90° angle).

In the diagram above, we have a right triangle with legs a and b and hypotenuse c. In a right triangle, the hypotenuse is always the longest side and it is always the side across from the right angle. The legs are the two sides that join together to make the right angle. In our diagram, around the sides of the triangle are squares. Each square is made from sides that are the lengths of the three sides of the triangle. The Pythagorean Theorem tells us that if you take the squares of a and b, the areas of those two squares can be used to make up the exact same area as the square of c. Mathematically, for older students, this concept is easily written out as:

a2 + b2 = c2

For younger students, if they are able to calculate a number multiplied by itself, then they can make the calculations to figure out the areas of these squares.

For practical calculation purposes, if you know any two sides of a right triangle, you can use this theorem to calculate the missing third side.

Parsha Connection:
We are given specific dimensions for the construction of the ark: 
*length- three hundred cubits 
*width- fifty cubits
*height- thirty cubits

However, we are also told that the roof should be 1 cubit high and, according to Rashi, it slopes for the flow of water off the roof. Essentially, the roof is created in the form of an isosceles triangle (a triangle with at least 2 sides of equal length), with the vertex of the triangle up at the top of the ark. 

Using what we know about the dimensions of the ark and the Pythagorean Theorem, how can we figure out the width of the wood needed to form the two sloping sides of the roof?

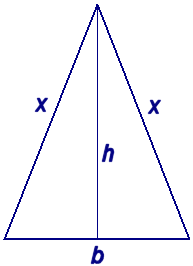
Let's visualize a view of the roof from the front of the ark.


If we're looking head-on, this could be a sketch of the roof of the ark:
*The 2 sides, x, would be each of the two sloping sides of the roof. 
*The height, h, at the center, would be the 1 cubit height that is described in the parsha.
*The bottom, b, would be the width from one side of the ark to the other- 50 cubits, as described in the parsha.

But how does this help us? This is an isosceles triangle. We know that the Pythagorean Theorem only applies to right triangles. If you look carefully at the triangle above, you can see that we can actually break the isosceles triangle into two congruent (exactly the same) triangles- if we cut the isosceles triangle along the height line, h, then we have two congruent right triangles. The legs of the triangle will be h and half of the bottom b; the hypotenuse of each triangle will be the slopes- x. 

Let's put this information back into the format for the Pythagorean Theorem:

a2 + b2 = c2

The a will be replaced with our h- the height line.

*Remember we said that h was the height given in the parsha- 1 cubit.
The b will be replaced with our new b number- 1/2 of the width distance b.
*Remember we said that this was the width given in the parsha- the full width of the ark was 50 cubits, so half of that width (to calculate for the right triangle) is 25 cubits.
The c will be replaced with our x- the slopes of the roof.
*This is the missing information that we're looking for.

So, now we can put our own numbers into the set-up for calculation:
a2 + b2 = c2
h2 + b2 = x2
12 + 252 = x2

Now we calculate:

12 = 1
252 = 625

So, 1 + 625 = x2

626 = x2

Now we need to know what number multiplied by itself will give us 626. For older students, they would either use a square root function, or, by hand, they could use prime factorization to possibly calculate the number. Younger students might use guess, check, and correct to narrow down the number to an approximate length. 


If we just look at the numbers, we know that 252 = 625, and we're looking at 626- a number very close. Just by looking at it, we can see that the length of the sloped side will be very close to 25 cubits, but a little bit longer (since 626 is larger than 625).

If we actually calculate the square root using a calculator, we get 25.02 cubits (if we round the number).

If we calculate using prime factorization, we get that 626 = 2 x 313. Since these are both prime numbers, this doesn't help us to come to a number.

So, with our calculation, we know that the pieces for the sloped roof of the ark needed to be approximately 25.02 cubits wide. The complete measurements of these sloped pieces needed to be 300 cubits long (to reach from front to back of the ark) and 25.02 cubits wide to reach from the tip of the roof down to the top of the sides of the ark.


Everyday Connection:

The world is a spacial environment. We have squares and rectangles all around us. Do you know that if you break squares and rectangles in half by making a diagonal cut from one upper corner to the opposite bottom corner you are actually creating two congruent right triangles? That length of the horizontal cut is actually the hypotenuse of each of those right triangles. Did you know that TV and computer monitor sizes are actually measured by that hypotenuse length? 

An activity for younger students is a geometry scavenger hunts, where they need to list different shapes that they see in the world around them and connect them to what they've learned in class. This can actually be done at any age and really helps students open their eyes to how the material they are learning is part of their environment. What triangles do you see around you every day?

Thursday, February 20, 2014

Vayakhel- A multi-level hands-on activity

"'Every wise-hearted person among you shall come and make everything that Hashem has commanded: the Tabernacle-spread, its Tent-spread, and its Cover, its hooks, its beams, its bars, its pillars, and its sockets; the Aron and its staves, the Lid, the Parochet screen; the Shulchan, and its staves, and all its implements, and the Bread of Surfaces; and the Menorah of illumination, and its implements, and its lamps, and the oil of illumination; and the Mizbe'ach for the Incense and its staves; and the anointing oil and the incense spices; and the entrance screen for the entrance of the Mishkan; the Mizbe'ach of the olah-offering and its copper lattice, its staves, and all its implements; the Kiyyor and its pedestal; the curtains of the Courtyard, its pillars, and its sockets, and the screen of the gate of the Courtyard; the pegs of the Mishkan, and the pegs of the Courtyard, and their cords; the mesh garments of the holy for Aaron the Kohen and the garments of his sons, to be Kohanim.'" ~Shemot 35;10-19

The above passage gives the list of items which the Jewish people were instructed to build as part of the Mishkan for worship in the desert. What follows afterwards in Shemot 36;8-38;20 are detailed descriptions for the building of the Mishkan and all its contents.

Note: Whereas most weeks I try to provide some added insight or understanding into the parsha through my mathematical investigation, this week's topic is an overview for an academic unit based on the information provided in the parsha. The students completing such a unit would certainly gain a deeper insight and understanding of the mishkan and it's contents. 

The major substantive part of this week's parsha is very specific blueprints for building the mishkan and it's contents- the aron, mizbeach, kiyyor, menorah, etc. 

An outline for a hands-on learning opportunity for multiple levels:
Older students can use the details to draw a scale blueprint. This would include:
--conversion from Torah measurements to modern day measurements
--adjusting measurements to a scale proportion
--accuracy of measurement and drawing in their blueprint
--attention to detailed descriptions provided in the text
Older students can create a list of required supplies and materials to build a scale model. This would include:
--accounting for amounts of each material needed based on length, width, height, area, etc. of where and how each material is used
--computation of conversions between the blueprint and model sizes
--being mindful of economic use of materials and trying to calculate to take only what's needed and use materials in such a way that minimal scrap is left over
Younger students can use the blueprint and/or text to help create materials lists. This would include:
--listing the different parts that are to be created
--listing the different materials that are used/needed
--counting out items, such as rings for attaching panels, to determine how many are needed all together throughout the project
Students of all ages can work together on building the model. This would include:
--measuring out and cutting materials to size
--following the blueprints of the text and that created by the student to accurately build the mishkan and it's contents.

Thursday, February 6, 2014

Tetzaveh- Mixed Bag of Elementary Geometric Problem Solving

"You shall make the Choshen of Judgement the work of an artist, like the work of the Eiphod shall you make it, of gold, turquoise wool, and purple wool, and scarlet wool, and twisted linen shall you make it. Square shall it be, folded, a zeret its length and a zeret its width. You shall fill it with stone filling, four rows of stone: a row of odem, pit'dah, and barekes- the one row; the second row: nofech, sapir, and yahalom; the third row: leshem, shevo, and achlamah; and the fourth row: tarshish, shoham, and yashfeh; they shall be of golden settings with their fillings. The stones shall be according to the names of the sons of Israel, twelve according to their names, like the engraving of a signet ring, each man by his name shall they be, for the twelve tribes." ~Shemot 28; 15-21

This week's parsha gives us a description of the structure of the Choshen, or the breastplate, that the Cohen Gadol (High Priest) wore. The mathematical parameters that we are given are:
--1 zeret x 1 zeret square, when folded (this is following Rashi's interpretation of the text; also according to Rashi, 1 zeret = 1/2 amah or approx 9-12 inches)
--12 stones, representative of the 12 tribes
--the 12 stones should be organized as 4 rows of 3 stones each

I'll provide here some problem solving questions and answers, but the true way to learn through these questions is by making models or diagraming the problems to sketch out a way of calculating the answers.

Geometric problem solving:
If we know that it needs to make a 1 zeret x 1 zeret square when it's folded once, what are the dimensions of the original shape before it is folded? What is the name of the original shape?
*Answer- In order to be folded once and become a square, we know that, on the original shape, one side is 1 zeret long. The second side, in order to be 1 zeret when folded, would have to be twice as long originally, or 2 zerets (zratim? zratot?) long. Thus, the original shape, before folding, was 1 zeret x 2 zrat__, which would give us a rectangle.

Follow-up for higher levels could be to calculate the area of the Choshen (the original rectangle, and the folded square)- What's the area measured in zrat__, amot, and modern day measures? Do you see a pattern in the rectangular areas compared to the square areas? (hint: you should!)

Representing Multiplication Arrays as Rectangles:
We are told that the 12 tribes were represented in a 4 x 3 arrangement on the Choshen. What other possible organizations could have been used to lay out the 12 stones (assuming complete rows and columns)?
*Answer- When organizing a given number of items into evenly divided rows and columns, we are essentially looking for the possible combinations of factor pairs for the given number. Laying items out in rows and columns (or drawing them out) is a common technique for diagraming factor pairs when students are first processing multiplication facts. This both helps them come up with factor pairs for a given number and also helps set a basis for areas of rectangular shapes when they move into geometry. These rectangular diagrams of factor pairs are called arrays. 
Here we are looking for all possible factor pairs that will make 12. The Torah gives us 4 x 3 (4 rows, with 3 columns in each). What else can we find?

1 x 12
2 x 6
3 x 4
4 x 3 (Torah's description)
6 x 2
12 x 1

In total, there are 6 possible arrays for 12 items. Half of them are repetitions (1 x 12 can be the same as 12 x 1), but it's important for students to understand that swapping the length and width results in the same total number of items (or area)- an internalization of the Commutative Property: changing the order in multiplication or addition facts does not change the final product or sum.

What shapes could the stones be in order to fit into the Choshen as it is described?
*Answer- They could have had round or square stones, which would have left uneven spaces between rows and columns. Alternatively, if they were oval or rectangular, it would have made it possible to allow for equal spacing between rows and columns on the square plate. Try it and see.